


Alle Fragen auf einen Blick
Hier finden Sie alle Fragestellungen auf unserer Homepage auf einen Blick.
Hier finden Sie alle Fragestellungen auf unserer Homepage auf einen Blick.
Foundation requirements
The foundation must meet the following requirements:
Concrete: C25/30 XF1 XC2
Rebar: BST 500 S wire & slash; 10 mm
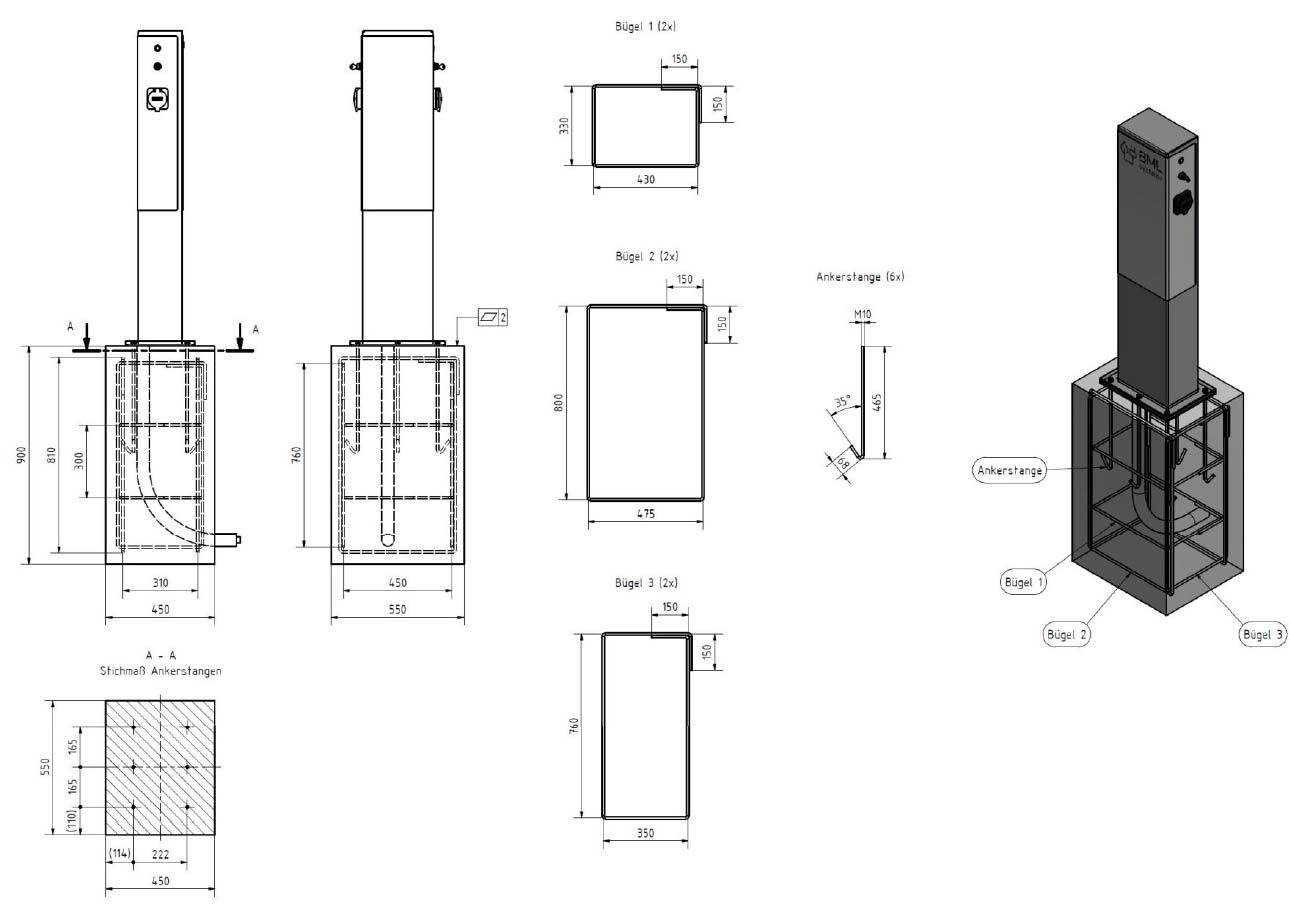
Foundation reinforcement plan
The reinforcement plan is shown in the following figures. In particular, ensure that the foundation is sufficiently level:
Ladesäulen Plug / Draw
Ladesäule Close

We recommend concrete foundations (B25) for free-standing systems, with the dimensions per frame side being 450 x 450 mm. For smaller systems, a continuous foundation with the following dimensions is required: system width + 450 x 450 mm. The foundation should be enlarged depending on the ground conditions. The depth of the foundation should be at least 700 mm, depending on the frost line in the soil. Before excavation, it is advisable to obtain a plan of the planned installation site from the relevant authority so that pipes, electrical cables, etc. are not damaged. Please ensure that the cables are pulled before concreting.
.jpg)
If the system is set in a concrete foundation, the depth of the embedded parts should be 350 mm - 500 mm.
If the system is screwed on to a concrete foundation, you must use bolt anchors (diameter 10 - 12 mm) or equivalent.
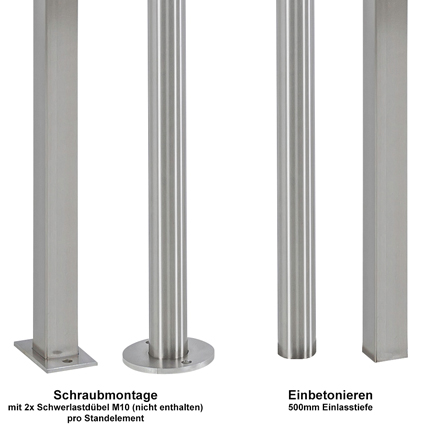
We recommend our cover rosettes to finish the screw connection and the transition into the ground.

1. Check
The wall on which the letterbox system is to be mounted must be clean and even. It is important to ensure that the wall is sufficiently strong. Depending on its size, a letterbox weighs between 5 and 18 kg.
2. Measure
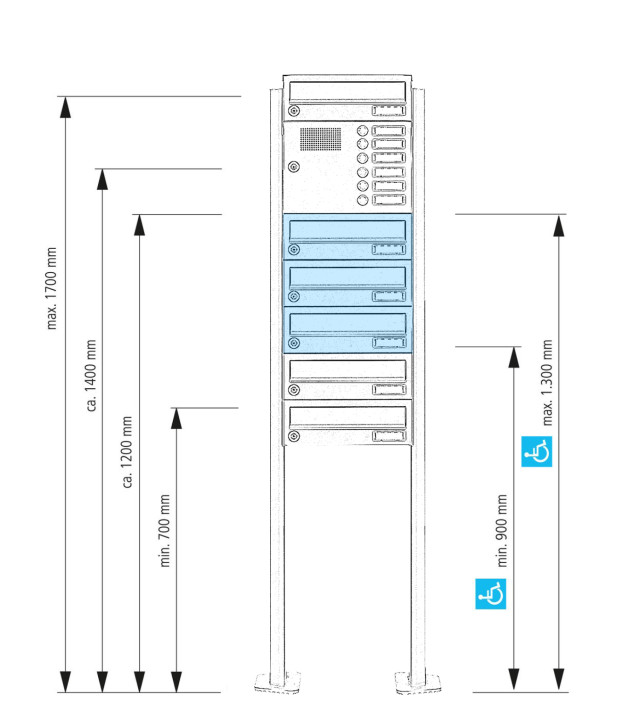
Measure the mounting holes on the back of the system. Transfer these measurements to the wall. Please note the installation height prescribed by DIN 13724. The centre line of the lowest insertion opening should not be below 700 mm. The centre line of the highest insertion opening should not be higher than 1,700 mm. Only in exceptional cases (barrier-free access) are 400 mm and 1,800 mm permissible as the lower and upper limits.
3. Drilling
Drill holes in the wall and insert wall plugs in the holes. Attention: The size of the holes and the type of wall plugs depend on the respective wall properties and must therefore be determined on site. If in doubt, please seek expert advice locally.
4. Screw
Open the doors of the boxes in which the mounting holes are located and insert the appropriate screws with the spacers into the dowels through these boxes. Screw the system together. This step is best done by three people.
Our in-wall systems are equipped with pre-cut cable inlets on all sides, which can be easily removed if necessary. We recommend having the in-wall system installed by a professional, as installing systems in house walls can create thermal bridges if the insulation layer is interrupted during installation.
1. Measure height and width
Measure the exact width and height from the back of the letterbox system. This is important because you need the dimensions without the plaster cover frame. Add a total of approx. 20 mm to these dimensions in both height and width and then draw a rectangle on the wall in which the system is to be installed using these dimensions. Please note the installation height prescribed by DIN EN 13724. The centre line of the lowest insertion opening should not be below 700 mm, and the centre line of the highest insertion opening should not be higher than 1,700 mm. Only in exceptional cases are 400 mm and 1,800 mm permissible as the lower and upper limits.
2. Measure depth
Now measure the overall depth of the letterbox system and add a further 5 to max. 10 mm.
3. Break out niche
Then break out a niche in the wall within the marked rectangle and to the depth of the system.
4. Fit the system
Then carefully fit the system into this niche and, if necessary, correct the niche size.
5. Drill
Bring the system into its final position and mark the drill holes on the wall. Remove the system from the niche and drill the corresponding holes in the back wall of the niche and insert the wall plugs into the holes. Caution: The size of the holes and the type of wall plugs depend on the respective wall properties and must therefore be determined on site. If in doubt, please seek expert advice on site. Tip: The system can also be attached via the side panels.
6. Screw
Now reintroduce the system into the niche, open the doors of the boxes containing the mounting holes and insert the appropriate screws into the dowels through these boxes. Screw the system together. Make sure that the plaster frame completely covers the niche.
To achieve optimal water protection for your post, the system/letterbox should be equipped with the above-mentioned panels or a rain canopy. If possible, the letterbox or letterbox system should be located under a canopy. The post is only protected from water when it is completely placed in the box and the flap is closed. If mail is not fully inserted, moisture and dirt can get into the letterbox. It is therefore necessary to plan sufficiently dimensioned letterboxes for the upcoming demand. We offer extra letterbox depth for increased mail volumes, and we are also happy to manufacture individual special sizes. However, water can still enter the letterbox under certain extreme weather conditions (according to DIN EN 13724 up to 1ccm). This is not a reason for complaint.
In a letterbox system, the post is protected from wind and weather. However, when installing a free-standing system, make sure that the insertion front is not directly facing the weather side, in line with good craftsmanship tradition.
Our complete sets are usually ready for connection! We already program the complete sets at our factory.
However, we always recommend having the electrical installation carried out by an electrician. Please always refer to the operating instructions provided by the manufacturer for wallboxes, intercoms and video systems!
Camera, intercoms or wallbox preparation
We offer preparation of cameras, intercoms and wallboxes from various manufacturers for our systems. The preparation does not include any end devices; it involves the provision of the screw fittings, drill holes and perforations. This means that you can easily mount your end device.
General warnings
Our light and bell modules, as well as our light and bell push buttons, may only be operated at a maximum of 12-24 volts! A transformer with VDE certification must be used! Higher voltages can endanger human life and will void the warranty. Only components with a 100% permissible duty cycle may be connected to the buttons and modules! Failure to observe this warning may result in: - fire hazard - personal injury - destruction of components. Electrical devices may only be installed and assembled by a qualified electrician! Please check whether the power consumption of the standard power supply unit is sufficient for your planned connection (e.g. for bell, intercom, light control as well as cable length and cross-section).
Light/bell push DESIGNER
Light/bell push as a single push-button is used to switch on the lighting in the entrance area and/or a stairwell or to operate a signal generator.
Terminal L1/L2 = LED - illuminated ring 5-24V AC/DC
Terminal C/NO = contactor
Current consumption approx. 40mA
Switching capacity max. 50mA @ 50V DC 1W
Light/bell push button BASIC
Light/bell push buttons as single push buttons are used to switch on the lighting in the entrance area and/or a stairwell or to operate a signal generator.
Terminal +/- = LED illuminated ring 3-24V AC/DC, LED illuminated ring ‘light’ 6-36V 110V/220V AC/DC
Terminal NC/NO = contactor
Current consumption approx. 20mA
Switching capacity max. 5A @ 250V AC
LED light
Please note that our LED lights, if they have not been completely pre-wired and connected by us, may only be operated at 12 volts DC. Other voltages will destroy the LED light and shorten its lifespan.
Attention: Always ensure the correct polarity
If your letterbox is in its original packaging, your keys are in the letterbox (take them out through the insertion slot) or in the enclosed bag (this also contains the assembly aid and other small parts). Every letterbox that leaves our premises is carefully checked and packed. A declaration of care is enclosed by the employee who manufactured your new product. If you still cannot find your key, please feel free to contact us.
Plantillas de nuestras etiquetas identificativas en formato PDF. Puede etiquetarlas digitalmente, imprimirlas usted mismo y utilizarlas directamente. Recomendamos imprimir en papel grueso o film transparente.
Vorlage Sicherheits Namensschild Typ 1 [PDF Datei 0,03 mb]Only high-quality materials are selected and processed for the Briefkasten Manufaktur, which guarantees durability and timeless elegance. Please bear in mind, however, that noble materials in particular need to be cared for. Even normal environmental influences can cause soiling and even surface changes. Particularly in industrial conurbations or at sea, deposits in the form of flash rust can occur and the material can be attacked. Here, systems should be cleaned and maintained more frequently.
One of the materials we use for our products is stainless steel. This steel is characterised by its resistance to water, water vapour, humidity, food acids and weak organic and inorganic acids when used and maintained as intended. After the letterbox has been installed, it should be cleaned for the first time to remove any dirt caused by storage, transport or construction or installation work. Protective layers of paper, foil or adhesive residues must be completely removed after assembly, as they can lead to corrosion. The letterbox should then be maintained approx. every 3 - 4 weeks. We recommend our stainless steel maintenance spray. Please note: The cleaners must not contain any hydrochloric acid, chlorides or hydrocarbons. Under no circumstances should steel wool, steel brushes or similar be used for cleaning stainless steel, as such aids damage the protective surface and enable the formation of extraneous rust through abrasion. Corrosion caused by flash rust is excluded from the warranty. Stainless steel surfaces must always be cleaned in the direction of the rust.
Oxidising or mechanically acting cleaning agents must not be used, as they attack the anodised layer. Caution! Protect aluminium parts from cement, lime, plaster, etc.
Acrylic glass (Plexiglas) must not come into contact with organic solvents such as thinners, alcohols, fuels, etc. Glass cleaners also usually contain alcohols. Glass cleaners also usually contain alcohols. For cleaning, use only clear water with a few drops of washing-up liquid and a soft sponge. Dust must never be wiped away dry.
Water and small amounts of a mild cleaner can be used to clean the surface of the powder coating. If absolutely necessary, a small amount of turpentine substitute can also be used. Then rinse with water and a mild cleaner!
We recommend weekly cleaning and sealing with car wax at least four times a year for painted surfaces! For cleaning, use only clear water with a few drops of washing-up liquid and a soft sponge. Painted surfaces must also be dried and sealed with car polish. Caution: Do not use cleaning agents containing vinegar.
Please only maintain the cylinder lock with a special lock care spray. This way you can enjoy a functioning letterbox lock for a long time. It is best to clean and maintain letterbox hinges twice a year
You can find care and cleaning products in our care guide.
Please note: The cleaners must not contain salts, chlorides or hydrocarbons. Under no circumstances should steel wool, steel brushes or similar be used for cleaning stainless steel, as such aids damage the protective surface and enable the formation of extraneous rust through abrasion. Corrosion caused by rust film is excluded from the warranty.
Puede encontrar piezas de repuesto para cada producto directamente en las páginas de producto debajo de la descripción del producto.
En la Tienda de recambios para buzones de Manufaktur Lippe, encontrará importantes recambios para sistemas de buzones y buzones, desde placas de identificación hasta cerraduras de buzones.
A la hora de planificar un sistema de buzones, debería tener siempre en cuenta la norma DIN EN 13724 actualmente vigente (también conocida como "norma de buzones") para que usted o su inquilino no tengan ningún problema a la hora de recibir el correo.
La norma DIN EN 13724 le garantiza:
- Fácil entrega del correo sin cartas dobladas ni recogida personal en una oficina de correos, e. B. para sobres DIN C4 grandes
- Suficiente espacio de almacenamiento para volúmenes de correo más altos
- Sin problemas con el correo húmedo
- La mejor calidad a través de materiales especificados y probados
- Seguridad contra reducciones de alquiler a través de buzones estandarizados
Nuestros productos suelen estar todos probados según esta norma y marcados en consecuencia. Sólo unos pocos no cumplen esta norma. Find out more
Information about DIN formats that fit into the corresponding letterbox slot is cropping up more and more often. Here is a brief overview of the dimensions of the most common formats:
DIN A5: 148 x 210 mm
DIN A4: 210 x 297 mm
DIN A3: 297 x 420 mm
DIN B5: 176 x 250 mm
DIN B4: 250 x 353 mm
DIN B3: 353 x 500 mm
DIN C5: 162 x 229 mm
DIN C4: 229 x 324 mm
DIN C3: 324 x 458 mm
1.4301 se caracteriza por su buena soldabilidad con procesos eléctricos. Incluso sin tratamiento térmico, el acero es resistente a la corrosión debido a su bajo contenido en carbono. El contenido de carbono debe ser inferior a un porcentaje de 0,08, aunque en la práctica ya son habituales valores inferiores al 0,05%. También se puede pulir muy bien y es flexiblemente conformable. Está homologado para soportar temperaturas de hasta 600 °C. Su aspecto de alta calidad se aprecia especialmente cuando está pulido.
X5CrNi18-10 es un acero austenítico no ferromagnético, que contiene níquel y es relativamente blando. Para mantener el material libre de óxido y resistente a las incrustaciones, el 1.4301 contiene un mínimo del 13% de cromo.
En la actualidad utilizamos acero inoxidable 1.4301 para la mayoría de nuestros productos. En comparación con el acero galvanizado, tiene la ventaja de una mayor durabilidad y sostenibilidad. Nuestra pretensión para un producto fabricado es que dure toda la vida.
El material 1.4016 forma parte del grupo de los aceros inoxidables y también se conoce bajo la designación AISI 430 o X6Cr17.
Se denomina acero ferrítico y tiene un contenido máximo de cromo del 18% (mínimo 16%). El acero ferrítico es altamente magnético, a diferencia de los grados de acero austenítico. La propiedad especial del acero ferrítico inoxidable al cromo reside en su microestructura ferrítica. Esto es lo que hace que el 1.4016 sea resistente a la corrosión bajo tensión, que suele ser el punto crítico en los aceros inoxidables austeníticos. El inconveniente es la escasa soldabilidad del material.
El material se caracteriza por sus buenas propiedades de flexión, embutición profunda y pulido. También cabe destacar su insensibilidad al agrietamiento por corrosión bajo tensión y su resistencia básica a soluciones alcalinas, humedad o ácidos orgánicos diluidos, por ejemplo. No es resistente a la corrosión en agua salada.
En la actualidad utilizamos acero inoxidable 1.4016 para la mayoría de nuestros productos con recubrimiento en polvo que no requieren soldadura. En comparación con el acero galvanizado, este tiene la ventaja de una mayor durabilidad y sostenibilidad. Nuestra afirmación para un producto fabricado es que durará toda la vida.
El recubrimiento en polvo es un método de eficacia probada para refinar nuestras superficies. En este proceso, los recubrimientos en polvo cargados electrostáticamente se aplican a las respectivas piezas de trabajo mediante una pistola pulverizadora. A continuación, las piezas pasan por un sistema transportador para ser cocidas en el horno. A temperaturas de unos 180° Celsius, las estructuras del polvo y la superficie recubierta se adhieren entre sí. El proceso de calentamiento confiere al polvo una superficie de alta calidad, lisa o uniformemente estructurada. Realizamos el recubrimiento en polvo de piezas metálicas como acero, acero inoxidable, aluminio u otros materiales conductores de la electricidad.
Entre las ventajas del recubrimiento en polvo se incluyen una elevada protección contra la corrosión y una gran resistencia. Las piezas revestidas son resistentes a los golpes y arañazos, así como a los productos químicos y a la intemperie.
El revestimiento en polvo es una técnica de tratamiento de superficies especialmente respetuosa con el medio ambiente, ya que en los revestimientos en polvo no se utilizan disolventes ni diluyentes. Además, el proceso de recubrimiento en polvo ahorra recursos porque la pintura sobrante que se aplica se puede recuperar.
Utilizamos ambos términos indistintamente, por lo que el índice de abrasividad de nuestros productos corresponde siempre a grano 240. Este número indica la rugosidad/granulometría del abrasivo. La superficie es mate.
Entre otros materiales, utilizamos acero inoxidable para nuestros productos. Cuando se utiliza y se cuida como es debido, este acero se caracteriza por su resistencia al agua, al vapor de agua, a la humedad, a los ácidos alimentarios y a los ácidos orgánicos e inorgánicos débiles. Después de instalar el buzón, debe realizarse una limpieza inicial para eliminar la suciedad causada por el almacenamiento, el transporte o los residuos de construcción o montaje. Las capas protectoras de papel, película o residuos de adhesivos sensibles a la presión deben eliminarse completamente después de la instalación, ya que pueden provocar corrosión. Posteriormente, el buzón debe tratarse aproximadamente cada 3 - 4 semanas. Para ello recomendamos nuestro spray de aceite para el cuidado del acero inoxidable. Nota: Los productos de limpieza no deben contener ácido clorhídrico, cloruros ni hidrocarburos. En ningún caso deben utilizarse lana de acero, cepillos de acero o similares para limpiar el acero inoxidable, ya que estos medios pueden dañar la superficie protectora y permitir la formación de óxido extraño por abrasión. La corrosión causada por la película de óxido no está cubierta por la garantía. Las superficies de acero inoxidable deben limpiarse siempre en el sentido del cepillado.
Las superficies de acero inoxidable deben limpiarse siempre en el sentido del cepillado.
No deben utilizarse productos de limpieza que disuelvan el óxido o mecánicos, ya que atacan el revestimiento anodizado. ¡Precaución! Proteger las piezas de aluminio de cemento, cal, yeso, etc..
Peligro de aplastamiento.
Recomendamos una limpieza semanal y al menos cuatro veces al año un sellado con cera de coche para superficies pintadas! Para la limpieza, utilice sólo agua clara con unas gotas de detergente líquido y una esponja suave. Las superficies pintadas también se deben secar y sellar con cera para coches. Precaución: no utilice productos de limpieza que contengan vinagre.
Precaución!
Para limpiar la superficie del revestimiento en polvo, utilice agua y una pequeña cantidad de un detergente suave. Si es absolutamente necesario, se puede utilizar una pequeña cantidad de sustituto de trementina. A continuación, aclare con agua y un detergente suave!
Limpiar la superficie del revestimiento en polvo.
El vidrio acrílico (plexiglás) no debe entrar en contacto con disolventes orgánicos como diluyentes, alcoholes, combustibles, etc. Incluso los limpiacristales suelen contener alcoholes. Para limpiarlo, utilice sólo agua clara con unas gotas de detergente líquido y una esponja suave. El polvo nunca debe limpiarse en seco.
Cristal acrílico.
La principal diferencia entre el DoorBird D1100E y el DoorBird D2100E radica en la gama de características y equipamiento que ofrecen, lo que también afecta a su uso en diferentes áreas de aplicación.
El D1100E es un videoportero compacto pero potente. Ofrece todas las funciones básicas que cabe esperar de un portero automático moderno. Estas incluyen una cámara HD gran angular, función de intercomunicador bidireccional y control a través de la app DoorBird. El D1100E es especialmente adecuado para viviendas unifamiliares o edificios más pequeños en los que no se requieren funciones avanzadas como funciones de seguridad adicionales o interfaces adicionales.
El D2100E es una versión avanzada que ha sido diseñada específicamente para satisfacer mayores requisitos de funcionalidad y seguridad. Ofrece un rendimiento significativamente mayor y características adicionales en comparación con el D1100E. En particular, los edificios de apartamentos, complejos residenciales o propiedades comerciales se benefician de las opciones avanzadas de seguridad y de las numerosas opciones de integración en sistemas de domótica como KNX o Loxone. El D2100E también permite la gestión de múltiples entradas y puertas, lo que lo convierte en una solución más versátil.
La app Comelit permite un control y supervisión exhaustivos de los sistemas Comelit Ultra y Switch. Entre las principales funciones de la app destacan:
In many federal states and municipalities there are individual funding programmes. Find out about current Förderprogramme.
